
Kolkata Metro

Materials


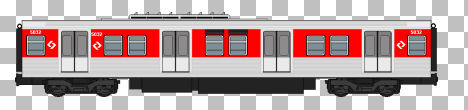
Using these, create a train or
You may use my train
You may use my train
Open a document 670 x 400 in PSP transparent
Paint with color #E9E7CD
Effects - Texture Effects - Texture - Canvas Fine
Effects - Texture Effects - Texture - Canvas Fine

Layers – New Raster Layer
Rectangle Selection Tool & draw a selection
Paint with color #808080
Effects - Texture Effects - Texture - Brick
Effects - Texture Effects - Texture - Brick

You will get this
Selections - Select None
Selections - Select None

Layers – New Raster Layer
Rectangle Selection Tool & draw a selection above this
wall
Paint with color of your choice
Effects – Plugin Filters – MuRa’s Seamless - Checks
Selections – Select None
Use Raster Deform Tool to get desired effects
You will get this
You will get this

If you don’t have the filter MyRa’s Seamless
Use Paint Brush in Deep & Light combinations
To give mosaic effects
Layers – New Raster Layer
Paint with color #C0C0C0
Effects – Texture Effects – Texture - Cork
Layers – Arrange – Send to Bottom
Click on Magic Wand Tool & select the first door
With Raster Deform Tool, bring it down

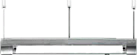
Copy & Paste the Line as new layer
If you do not know how to create a line
See my Diesel Locomotive tutorial
Copy & paste the posters of your choice
Above the Wall Layer
Above the Wall Layer

Stand in the top layer
Layers – New Raster Layer
Rectangle Selection Tool & draw a selection
Paint with a color of your choice
Effects – 3D Effects – Inner Bevel
You will get this

Layers – Duplicate
With Move Tool place the duplicate rod
Selections – Select None
Copy & Paste the lights below this rod layers
Stand in the top layer
Layers – New Raster Layer
Rectangle Selection Tool & draw a selection
Paint with color #1C3D21
Effects – Texture Effects – Texture - Squares
Selections – Select None
Use Eraser Tool in these Settings
And erase the edge to give Corrugated Sheet effect
We have done the background
Now animation
Stand in the top layer
Copy & Paste the train as new layer
With Move Tool place like this
With Move Tool place like this

Copy & Paste the train several times as new layers
Rename this layer ‘Train 1’
and place them like this
and place them like this

Enlarge the picture 150% by using the roller of the mouse
View - Ruler
For uniformity place them after 50
When you want to stop the train
Minimize the gap gradually
Again copy & Paste the train several times as new layers
Above the Line layer but below the platform layer
Place them from opposite direction
Place them from opposite direction

Copy & Paste the people in different layers
below the Train 2 layers
Minimize this document
Open a new document 500 x 200 transparent
Copy & Paste the compartment as new layer
Rectangle Selection Tool & select a door
Right click on the door – Copy
Right click & Paste as New Image
Right click & Paste as New Image

Now press the Shift in keyboard & select all 4 doors
Hit Delete in keyboard
Selections – Select None 
Copy this door & paste as a New Image
Minimize the original door, keep open the copy
Adjust – Hue and Saturation - Colorize
Use these settings
Use these settings

Layers – New Raster Layer
Right click – Paste into selection
Selections – Select None

Like these select all 4 doors one by one & do the same
Now you have 2 layers
One compartment without door & only 4 doors
Layers – Arrange – Send to Bottom
Open the original door
With Rectangle Selection Tool
Select left & right side separately
Copy & Paste as new image
Copy & paste these two sides as new layers
Above Back Door layer & below the layer Without Door
Then Merge Down these two sides
Does this 6/7 times, each time move a little close
Like the door is closing. All in separate layers
Rename these layers D1, D2, D3, D4, D5, D6 & D7 

Place the people above Back Door but below D1

Layers positions


Open the layers
Without Doors, Back Door, D1 & People
Edit – Copy Merged
Now open the original document
Open the background layers & ‘Train 1 Stop’ layer
(Where you think the Train 1 will stop)
Select ‘Train 1 Stop’ layer
Edit – Paste – Paste
as New Layer 
Enlarge the image 500%
With Move Tool place these 2 compartments above the
originals
You should be 100% perfect
Otherwise the Animation will jump up & down
If you have problem, enlarge it to 700% or 800%

Like this open D2 to D7 one by one
Edit – Copy Merged & Paste as New Layer
in original document
Then reverse it
Edit – Copy Merged & Paste as New Layer
In original document from D 7 to D1
We are done
For Animation open & close T1 one by one
Edit – Copy Merged
Paste in Animation Shop as New Animation
Then After Current Frame
Do the same for T2
Only when the T2 will stop
Open D1 to D7 then D7 to D1
Then as usual
I am giving the Layer’s positions
for better understanding


No comments:
Post a Comment