Materials
You
already know how to move a train
from
Diesel Locomotive tutorial
This
is all about how to change speed in the same layer
and how
to create a flyover
So
that you can use anything over it for animation
Either
Train or any kind of Motor Vehicle
Open a document in PSP 670 x 450 transparent
Paint
with color # 4681AA
Rename
this layer Sky
Rectangle
Selection Tool – Draw a Selection
Paint with # A09898
Effects
– Texture Effects – Texture – Concrete
Selections
– select None
Duplicate
2 times, with Move Tool set like this
Stand
in the middle layer
Effects
– 3D Effects – Drop Shadow
1 -1
– 80 – 14 Black
Bring
this layer at the top
Layers
– Arrange – Bring to Top
Layers
– New Raster Layer
Go
to Layers – Arrange and move this layer down
above
sky layer. Paint with # E9E7E7
use Raster
Deform Tool – Scale
Press
top and bottom to set like this
Layers
– New Raster Layer
Go
to Layers – Arrange and move this layer down
above
sky layer. Paint with # 463B3B
Effects
– Texture Effects – Texture – Concrete
Use
previous setting
With
Raster Deform Tool – Scale
Press
at the top and set like this
Rename
this layer Road
Layers
– New Raster Layer, add 4 layers
With
Rectangle Selection Tool
Draw
4 Rectangle in 4 different layers
Each
layer paint with color # C0C0C0 then selects none
I
have shown step 1, 2 & 3 then final product
With
Move Tool set them side by side like step 2
Use
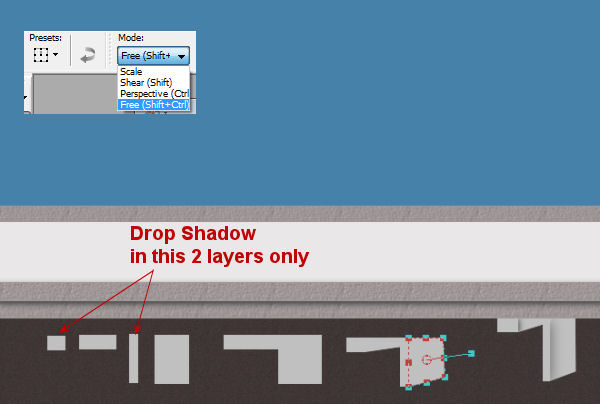
Raster Deform Tool – Mode Free
in 2nd
& 4th layer
Use
Drop Shadow like previous
in 1st
& 3rd layer
Merge
these 4 layers (Merge Down)
I
have just shown you, make the pillar taller
According to your background
Duplicate
3 times, merge this 4 layers
Layers
– Arrange and move this layer down
above
Road layer
Create
a Rail Line
Duplicate
and place like this
If
you do not know, how to create a line
See
my Diesel Locomotive tutorial
Create
an Electric Pole with Pen Tool
or
may use my Pole
Copy
& paste as new layer
Duplicate
3 times and set
Again
copy & paste as new layer
Image
– Mirror, Image – Resize 80%
Duplicate
3 times and set
Change
Foreground color to # 000000
Select
Pen Tool with this setting
Draw
like this for both sets of poles
Now
copy & paste the Bullet Train several times and move
See
my Diesel Locomotive tutorial
For
how to move a train and speed
Use
“View – Rulers” for uniform gap
How
I have written Parking
Selection
Tool – Circle. Paint with # FFFFFF
Selections
– Modify – Contract 2
Selections
– Invert
Layer
– New Raster Layer. Paint with # 0000FF
Then
written P with red
Collect
cars and apartments from internet and
decorate
the picture with those
We
are done
Now
copy & paste the Bullet Train several times and move
See
my Diesel Locomotive tutorial
For
how to move a train and speed
Use “View – Rulers” for uniform gap
Zoom
the image 400% by using the roller of the mouse
Then
paste the nose of the train at 660
Again
copy & paste the nose as a new layer at 630
Maintain
a gap of 30
If you
want to change the speed
Increase
or decrease the gap
It will
be like this
Keep
the background open all the time
Open
& close the Bullet Train layers one by one
Edit
– Copy Merged
Go
to Animation Shop and paste after current frame
Timing
At
Animation Shop, Edit – Select All
Right
click in any frame – Frame Properties, give 8
Edit
– Select None
Click
on First frame
Right
click – Frame Properties, give 200
Click
on Last frame
Right
click – Frame Properties, give 200
Both
these frames don’t have any trains
Note:
Ideal timing for Bullet train is 6
It will fast and the animation will be smooth
But a little blur, due to the speed of the train
8 is better for visual effect
I have given 10, so that you can see properly
Because this is a tutorial
If you cannot see properly
How will you do it ?
Now it is your choice
Use Trial and Error method
In
the second animation I have shown
how
you can change the animation
keeping
the same background
Layer’s
position
For
Flyover animation
I zoomed the image to 400%
For
Double Decker bus gap is 10
For
Blue & white Bus, gap is 20
For
Red Bus above flyover, gap is 30
For
high speed car gap is 30
For
slow speed car, gap is 20
Speed
difference is the cause of overtaking
And
for the whole thing I have given
Frame
Properties 8


No comments:
Post a Comment