Star Wars II
Materials
The
tutorial is same as my previous tutorial Star War
You
can do it, if you follow Star War
Therefore
I am not giving you details
Only
a shorter version
Open
a document in PSP 640 x 450 transparent
Effects
– Plugins – Flaming Pear – Glitterato
Copy
& Paste Spaceship1 as new layer
Duplicate
19 times, total 20 layers
Always
duplicate from original layer
Do
not duplicate from duplicate
It
will fade the picture
Select
first duplicate layer
Image – Resize 95%, Resize all layers unchecked
Resize
other 18 layers like this
Reduce
5% each time, until it is 5
Like
90, 85, 80,75 … 15,10,5
Layers
– New Vector Layer
With
Pen Tool draw a line as shown
Layers – Duplicate, Image – Flip
Copy
& paste Tie-Fighter several times
With
Move Tool place them from right top corner
Flip
the Tie-Fighter, copy & paste several times
Place them from right bottom corner
Duplicate
last Tie-Fighter of each set
Adjust
– Hue and Saturation - Colorize
Add
a vector layer in the middle of each set
With
Pen Tool draw a laser
Add
another 2 vector layers above Spaceship1
Draw
2 green lasers
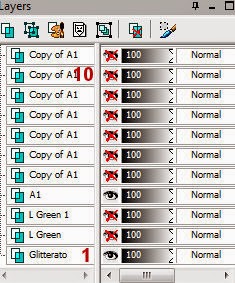
(For layers positions, see my layers)
At
the time of using red laser, on that frame
Move
the Spaceship1 little up & down
Copy
& paste Spaceship2 as new layer several times
Place
them and use dissolve at the end frame
Like I have shown in Star War tutorial
Open
& close the layers in the combinations you like
Edit
– Copy Merged and paste
in
Animation Shop after current frame
Layers
Positions
A =
Spaceship1, Q = Spaceship2
B =
Tie-Fighter first set
C = Tie-Fighter second set


No comments:
Post a Comment