
Church Lighting 2

Save
a picture of a church from google image search
Open
the picture in PSP
Copy
the picture (Edit – Copy), minimize the picture
Open
a new document at PSP 670 x 500
File
- New
(or
as you like) in proportion with your picture
Selections
– Select All
Edit
– Paste – Paste into Selection
Selections – Select None

View
– Rulers
Enlarge
the picture 500% by rolling the mouse
Select
Pen Tool
Set
Foreground color to dark red
Draw
lines at 10 points gap as shown in the picture
Lines
will come in a Vector Layer
Do
not worry, keep it like that


Set
foreground color to white (FFFFFF)
Select
Paint Brush size 4
Like
previous tutorial
Layers
– New Raster Layer
Click
in the side of the Church several times along the line

Close
the vector layer by clicking on the eye
Set
foreground color to red (FF0000)
Layers
– New Raster Layer
With
Brush click on first 3 points at the top
On both sides

Layers
– New Raster Layer
With
Brush click on next 3 points at the top
On
both sides
Like
this open a raster layer and
Click
3 points downwards
Just
above the white point
Until
you reach at the bottom of the Church
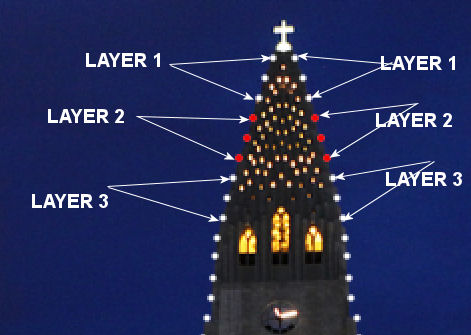
Rename
these layers R1, R2 …….
Close
the red layers
Set
foreground color to green (00FF00)
Like
previous click 3 points downwards
Just
above the white point
Until you reach at the bottom of the Church

Rename
these layers G1, G2 …….
Close
the green layers
Set
foreground color to yellow (FFFF00)
Like
previous click 3 points downwards
Just
above the white point
Until you reach at the bottom of the Church

Like
Previous, use Pen Tool and
draw
lines on the door
New
Raster Layer and click white points

Close
the vector layer
Layers
– New Raster Layer
Click
first 3 points with red
New Raster layer, then next 3 points

Like
this do green and yellow
We
are done
Now
animation
Close
all layers except background (The Church)
For
the first frame door will be like this
Open the layers by trial

Also
open the first red layer (R1)
Edit
– Copy Merged
Go
to Animation Shop
Edit
– Paste – Paste as New Animation
Then
close and open R2, R3, R4 …
also
the layer above the open layer on the door
Both
the side & door at the same time
When you reach R4, open G1

When
you reach G4, open Y1

All
the time
In
PSP, Edit – Copy Merged
In
Animation Shop, Edit – Paste – Paste After Current Frame
Timing
by default 10
You
don’t have to anything
Again
color and Church is your choice
You
don’t have to do like me
If you are not comfortable with 3 colors
Do it with 1 color
It will also look good
If
you have any problem
Send
me an e-mail
My e-mail address is in the home page
Tutorial is very beautiful.
ReplyDeleteThank you.
My version is here. >>>
http://msrf-designs.blogspot.com.tr/2015/12/saat-kulesi-sklandrma.html
Thank you very much.
DeleteYour version is beautiful.